Friday, August 12, 2016

Unreal C++

This weekend's objective:

Create 2 c++ classes and expose them to blueprint. This may turn out to be nastier than I expect since I need to brush off my c++ coding skills and install a c++ editor.

TMap wrapper
It boggles my mind that Unreal doesn't support maps/hashes natively. Any language worth its salt has this.

In case you don't program much, these are the core containers that need supported:
array/list (a list of objects in order. A list is usually a wrapper around an array automatically managing size)
map/hash (using a key you can get an object back)
set (unique container of objects. I can limp along without this but it is handy)

Environment maintenance
I will be procedurally constructing everything. I need a class that will manage this that I can expose to blueprints. Example: As the player moves, this class will update the environment. Environment construction relies on a seed for randomly generating everything. It also relies on a variety of performance settings. This will not only control object/landscape/actor spawn/de-spawn but perimeter effects such as fog. It will have a variety of other tasks I will implement later as things progress

This is pretty close to where I want to begin with environment creation:

I will start with something brain-dead simple like this:


When I have something working I will post a screen shot of it.

Wednesday, August 10, 2016

No Man's Sky


I haven't played the game yet but I've been reading reactions. This is very important because I am also creating a procedural world. I will be posting reactions that provide specific insights.

Here is one:

https://www.reddit.com/r/gaming/comments/4x1ua9/just_remember_this_piece_of_common_sense/d6bt69y

Been playing this game for a while now, and even though it's too early to give a final opinion on this game, so far it's been underwhelming to say the least. I don't personally care about multiplayer as much as I do about just how empty this game is, and how quickly you end up recognizing the patterns behind the algorithm that generates these terrains, plants and animals. Once you do, all of the interest in exploring new planets quickly fades as you realize that the next animal will simply be a new permutations of parts you've already seen, or that the next planet will be a combination of geologic and plant features you've already seen but just shuffled up differently. If you have a few dozen body designs set for each section of the body, you can get an insane amount of permutations (just how you can shuffle a 52 card deck into an absurd number of variations), but ultimately they're all the same.
The survival mechanics are horribly unfun. I'm not sure many people seem to enjoy mineral collection, especially due to a really small inventory size. It mostly consists of scanning and following icons, and is incredibly repetitive and not very rewarding. Combat is also really unsatisfying, with enemies that don't react to getting hit and no real threat outside of space (where the main weapon is a lock-on laser). The exploration controls with the ship are pretty decent and it's fun to fly around while listening to the excellent atmospheric music, but wears out its welcome fast because there's not much exciting hidden content. The monoliths you find don't give much, alien outposts are not exciting.
There are a few things that this game needs badly:
  1. Implement bases, storage, and furniture. This needs to be done almost immediately. I want to be able to set up base camps on planets, forge for resources, and store extra stuff.
  2. Add unique non-generated content that add some sort of story or quest with specific details about a past civilization, more than the generic monoliths. The bottom line is this: human-made content with some sort of narrative will always, always have more thought put into it than content spit out haphazardly by an algorithm.
  3. Bases need special atmosphere bubbles, so you cant start farms and bring different animals from different planets there. This should include plants, let's grow plants from other planets on new planets, or seed dead worlds.
  4. I want to be able to take animals to them and move them from planet to planet. Add cargo ships at least.
  5. Fix the map so we can see the names of the systems you've already been to.
  6. Fix the inventory so its not a nightmare to manage. You spend most of the time in this game mining and grinding for materials, at least make this part seamless.
  7. Add some variation to the animal behavior. Simply varying the colors and meshes isn't enough, they all do similar pathfinding and don't attack and interact with each other. There should be an entire ecosystem of realistic behaviors, with full life cycles and possibly some mechanics that we can study these and earn some sort of reward. Right now "taming" them essentially means they poop out resources.
Those need to be done like, IMMEDIATELY. I can respect the sheer ambition of this title, but the fact that this was developed by a team of like 15 people also shows throughout. This game is fucking empty.

Sunday, August 7, 2016

Choosing a direction

There is so much to learn it can be overwhelming to know where to go next, The myriad of directions leaves you sometimes going in none. Option overload...

Should I polish my blender skills?
Should I continue to study blueprints?
Should I practice importing meshes and textures?
Should I build a sample scene?
Should I write some C++ and see how it hooks into the engine?
Should I build some materials?

The list goes on and on...

I generally know what I need to do but I am afraid if I try to hit the ground running with too little tool knowledge I will handicap myself by doing something the wrong/hard way.

I'm sure other game developers feel this way too. I could spend a year just learning tools inside and out and that would leave me without any progress on my game.

I think I am going to spend the day brushing up on my blender skills. I've done a ton of blender work in the past but I've noticed my second nature keystrokes have gotten rusty. I need that 3D modelling back in working order. Building meshes quickly and getting them into Unreal is very important for a 1 man shop like myself.


Saturday, August 6, 2016

Multiple Texture UV Mapping in Blender for Unreal 4

Multiple Texture UV Mapping in Blender for Unreal 4

That is quite a mouth full for a title but it is important for creating a large and efficient environment.

The current trend with texture mapping is to create 1 material per object. This allows you to do some very cool things with tools like Substance Designer. If you have a lot of objects, that is going to be a lot of textures in memory.

I am building a game that will have expansive landscapes / scenes. I need to be very performance conscious from the outset. This includes reusing textures and mapping multiple textures onto one object when necessary. This will allow me to have fewer textures in memory.

I am a bit rusty with Blender but it is coming back to me.

Here is a simple example of creating a cube with collision and 2 texture UV mappings. I can view the object in blender with the textures and in Unreal with the textures once imported.


STEP 1: Setting up Blender (One time setup)


Unreal has a different object scale than blender. We need to adjust blender to build objects to Unreal's scale. Set scale to 0.010


We also need change the view clip so it doesn't freak out with unusually large scaled objects:


Make sure the end value is 500m not 500mm.

I scaled up the default cube so it looked normal size.


STEP 2: Collision Mesh


I copied the cube, slightly enlarged the copy, renamed the copy to UCX_{object name}_{number}. I also changed the UCX to be wireframe. Note: You can have as many collision meshes for an object. Each collision mesh must start with UCX_{object name}.


Step 3: Add Materials


I used to do UV mapping without adding materials in blender. This worked for UDK. This does not work for Unreal...

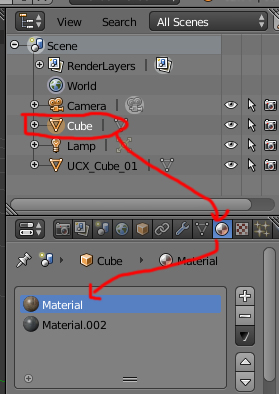
Select your object and add a material:


With the material selected, click on the texture tab and load the texture:


Repeat this process for the second material/texture.

Step 4: UV Mapping


Before we do UV mapping, lets make sure the object will display the textures from the UV editor in the 3D View:


Now we need to UV map onto the material and simultaneously a texture with the UV editor.

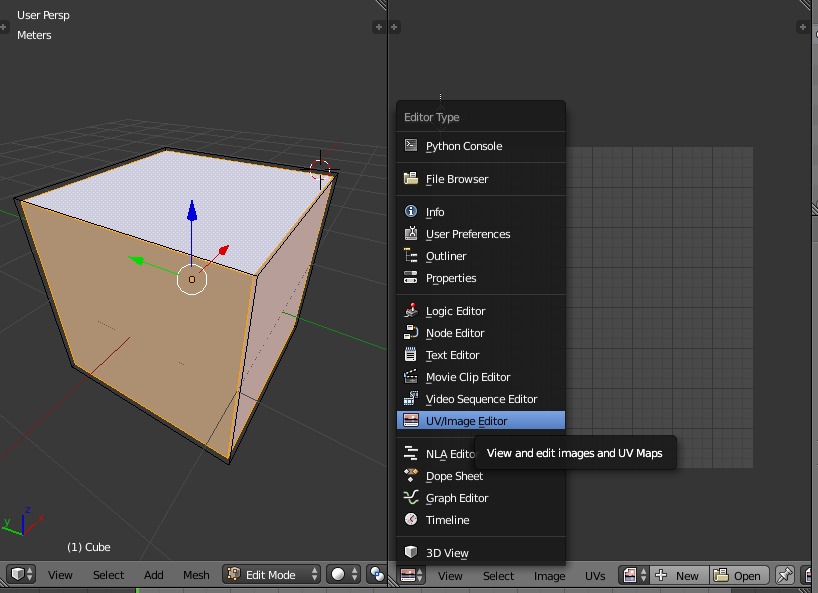
Lets split the 3D view to include the "UV/Image Editor":


Select the cube, go into edit mode, be in face select mode, select 3 of the 6 faces (3 for 1 texture and 3 eventually for the other), press U for unwrap and select "Smart UV Project". Now open the texture in the UV mapping for the 3 sides:


Now to complete the mapping we need to assign it to the material:


Repeat this for the other 3 faces. In the end you will have an object that looks like the one in the 3D view above.

Step 5: Import into Unreal


Now export this to FBX. Don't adjust any settings.

Open Unreal and import the FBX. If everything went well, you will have a properly scaled object with collision and 2 texture materials mapped to it:


This will drop right into the level and works.

The end goal is to not load the textures/materials into Unreal since they should already exist. But for a quick Proof of Concept, this worked surprisingly well.

My only complaint is I have to make sure I have the textures selected in the UV editor or it won't display correctly in the 3D View. It will render, but that isn't very helpful when building/adjust the object.

Friday, August 5, 2016

Unreal Blueprint Research

Unreal Blueprint Work

I am starting to dig into blueprint. I do software development in Ruby and have done c++ and Java among other languages so programming doesn't worry me. 

I am trying to wrap my head around 3D specific concerns such as vectors, rotators, transforms, lerps, etc.

I created this cheat sheet I will tape to the side of my monitor for reference until I have the variable colors and types down cold:


I watched a few quickie blueprint videos from Unreal on creating a hovering object and slowing time until a character moved. Those were amazingly easy. 

I'm building a text file with a list of important functions as I run across them in tutorials. I will post the contents of it here. I will update a number in parens when I encounter the function multiple times. This will help me gauge the usefulness of the function.

========================================================================
UNREAL BLUEPRINT NOTES
========================================================================

---------------------------------------------------------------------------------------------------
Variable Types
---------------------------------------------------------------------------------------------------

https://docs.unrealengine.com/latest/INT/Engine/Blueprints/UserGuide/Variables/

Boolean (RED)

Integer (CYAN)

Float (GREEN)

String (MAGENTA)

Text (PINK)
 localization?

Vector (GOLD)
 3 floats (traditionally for XYZ or RGB)
 https://www.youtube.com/watch?v=WHGkLLIlz78

Rotator (PURPLE)
 group of numbers defining rotation in 3D space
 Ususally just interested in Pitch and Yaw

Transform (ORANGE)
 Cobines 3 attributes of an object:
 translatioon (3D location)
 rotation
 scale

Object (BLUE)

---------------------------------------------------------------------------------------------------
Terms
---------------------------------------------------------------------------------------------------

Primitive Component
> any component we can apply physics to (ex: static mesh)

---------------------------------------------------------------------------------------------------
Notes
---------------------------------------------------------------------------------------------------

To make an object be able to move, must sure you change "Mobility" to Movable

You can drag blueprints onto objects in the component list to associate them
> example was a hover blueprint. Dragged onto a movable object, it made it hover
> scene component blueprints have this ability. Maybe others. Unsure

---------------------------------------------------------------------------------------------------
Functions
---------------------------------------------------------------------------------------------------

DEBUGGING .........................................................................................

Draw Debug Line
 draws a line between 2 points.

Line Trace By Channel
 Draws and erases a line every frame

Print String (USEFUL FOR DEBUGGING)
 Prints a string on the screen (great for debugging)

Get Display Name
 Lets you get the name of an actor
 Can be used to show the name of an actor you have hit with a vector
 This does not appear to work on static meshes

CONSOLE ...........................................................................................

Execute Console Command
 Example: slomo

EVENTS ............................................................................................

Event Begin Play
 When game play starts

Event Tick (3)
 Fired at every frame

ACTOR EVENTS ......................................................................................

Event Actor Begin Overlap
 When another actor overlaps this actor
 You can cast this to ThirdPersonCharacter

Event Initialize Component

VECTOR MANIPULATION ...............................................................................

Break Vector
 Allows you to manipulate each component (X,Y,Z)

Convert Vector into Linear Color
 Covert RGB into single value for "set light color"

Get Vector Length
 Get the magnitude/length of a vector (returns a float)
 Can be used to convert a vector into a useful float

Vector + Vector
 Adds 2 vectors

UNCATEGORIZED .....................................................................................

Break Hit Result
 Breaks out the result of a vector hitting an object
 Can be used to break out the result of "Line Trace By Channel"

Build String (Float)
 convert float to string with a prefix.
 Can be fed into "execute console command"

Get Actor Location
 Get the location of the actor

Get Control Rotation
 Rotation of the object

Get Forward Vector
 Can be used to convert a rotation into a vector
 > The length of the vector is 1 (XYZ values are decimals less than 1)
 > This produces a normalized/direction/unit vector (it always has a length/magnitude of 1)

Get Owner
 Actor a blueprint has been attached to
 > useful for doing work against the owner and inspecting it

Get Velocity
 Get velocity of object (vector)

Launch Character
 You can add a velocity to an actor

Map Range
 Convert 1 range of numbers proportionally into a different range
 Useful for coverting a large range to 0 thru 1 or vice-versa

Random Unit Vector
 creates a random vector (3 variable array)

Set Light Color
 Change the color of a target light

Set Timer by Event
 Allows you to create a looping timer that can trigger an event

Monday, August 1, 2016

Distance and VR

Distance and VR.


I played 15 minutes of "Call of the Starseed" yesterday for the first time.

I am immune to immersion in VR. I've spent way too many hours within VR for it to emotionally affect me. Because of this I immediately look for drawbacks in design.

I think this title, along with others, suffers from scale. I can see how far out the stars are and I feel enclosed within a large bubble. This may be done for performance reasons but it makes me feel like I am not in a world but on a stage.

Having an unending horizon is very important to me and I will be making it a high priority. I would rather the edge of perception be clouded/misty than give the feel that I am in a sphere.

One of my favorite games that deals with horizon and is amazing efficient is Blades of Brim by Sybo games.


I don't know how they do it but that game is amazing on an ipad. It even has portals! It is damn slick and an inspiration for me.

Sunday, July 31, 2016

Game Development for the Vive Begins

I've been thinking about what I want to make over the last 4 months. I have a pretty solid idea and now it is time to dig in my heals and start work.

I've been using Deepart as my poor man's art department.

This gives you a glimpse of what I am going for:
https://www.pinterest.com/seanrforeman/deep-art-best/

Here is a sample image:

It feels very different depending on the style applied via deepart.io:

Dark and moody:

Comical:

Psychedelic:

Idealistic:

My hope is to skin objects with different textures to maximize reuse and minimize effort on my part. I may need to use different distortions of the same object. If I build a scene only with programmatic logic it can automatically apply the appropriate texture and object variant without me lifting a finger. That is the theory.

Game development is not my job so I can only develop in the evenings and the weekend but I intend to focus a significant amount of spare time to developing this game (40+ hours per week).

Installation and getting the Vive working in Unreal

I may use 3D Studio Max. This is unclear. I first need to brush the cobwebs off my Blender knowledge and get the Vive up and running in Unreal. Once I have Unreal working I will move onto Unity.

1. Get Blender, Photoshop, Unreal installed on my Vive machine
> Blender (297 MB): https://www.blender.org/download/ (Free)
> Photoshop CS4 Extended (2 GB): (I bought this years ago prior to monthly subscriptions)
> Unreal 4.12.5 (18.56 GB): https://www.unrealengine.com/ (5% royalty. Free download)
> Notepad++ (13 MB): https://notepad-plus-plus.org/ (Free)

2. Get the Vive Headset working in Unreal
> Once Unreal comes up, the vive hardware turned on
> This worked flawlessly:
https://docs.unrealengine.com/latest/INT/Platforms/SteamVR/QuickStart/2/

3. Get the Vive Controllers working in Unreal
> I will be following this tutorial this evening:
https://docs.unrealengine.com/latest/INT/Platforms/VR/MotionController/

The meshes and textures are automatically available and updated by valve in this folder on your machine (one you install SteamVR):
Steam\steamapps\common\SteamVR\resources\rendermodels\vr_controller_vive_1_5

OK, this tutorial is giving me trouble:
1. I had to build a static mesh for the controller via blender and map a texture to it. I haven't played with blender in over 2 years but I stumbled through that.
2. I have never built a blueprint and they are leaving out important information. example: the blueprint is an actor blueprint. That may be obvious but it wasn't to me. I also have no idea where "view options" is in this maze of windows.
3. The tutorial appears to already be out of date with the latest version of Unreal.

I am going to need to punch through some Unreal tutorials before I can go further. I was hoping to avoid this but there is just too much going on and I need to wrap my head around it.

Unreal Tutorials:
Basic Tutorials
  UI Overview (Done)
  Blueprint Jump Starts (Starting Tonight)

This is going to take a few weeks...
I AM HERE...

This looks like a great tutorial:
http://www.tomlooman.com/getting-started-with-vr/

Lots of information on reddit:
https://www.reddit.com/r/unrealengine/search?q=vive&restrict_sr=on

4. Pipeline an object with a texture into Unreal


Monitoring and memory management
I will be procedurally building large portions of my game environment. I need to find out which engine is better at allowing me to add/remove objects and efficient use of LOD. I also need to see which engine "feels" better in the Vive.

1. Determine how to measure/monitor frame rate in both engines
2. Determine how to measure/monitor memory consumption in both engines
3. Add and remove objects via code in memory. Determine the threshold for object count in both engines.
4. Test effectiveness (memory/frame-rate) of LOD in both engines

That will keep me busy for a few weeks... I will update with information on each topic as I progress.