Friday, May 30, 2014

The Quest for Building the Best Possible Earth in UDK

This weekend I have decided to tackle the Earth. After many hours of work this task has become an obsession to make the best possible Earth in UDK. I want something that feels real when you are floating above it and that is no small task.

I have it in my final board, and although it looks OK it could look a LOT better. When I crack open a beer and sit at the end of the game overlooking the earth I want that to look as great as possible. The Oculus Rift should make you feel you are in another place and a great Earth model would go a long way towards that goal in space.

There are 2 tutorials I have watched on the topic:

1. A blender tutorial:

2. A UDK tutorial:

3. An additional UDK tutorial

It is also good to have a few reality checks:

And finally blue marble:


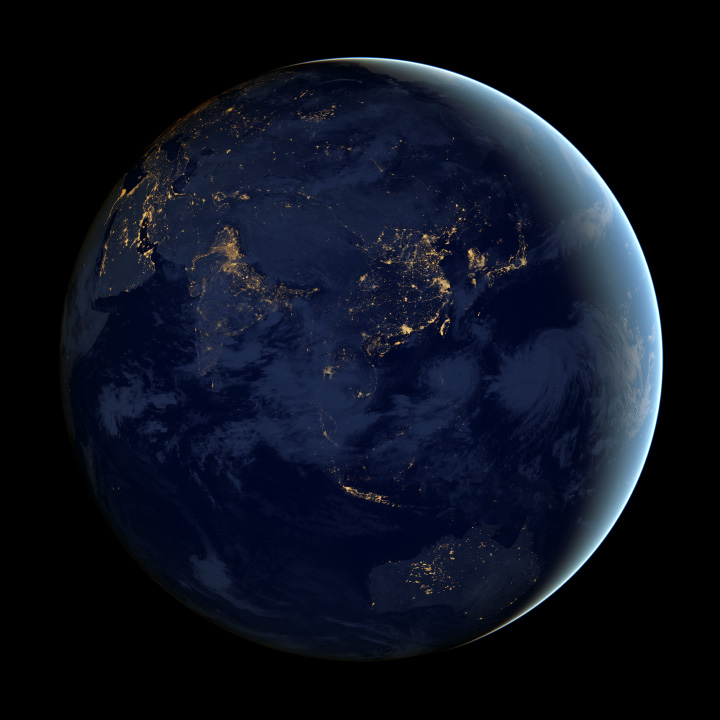
That blender Earth is sooo sexy. I need me some of that in UDK if it humanly possible. Comparing a 3D render to UDK is an unfair comparison but I think we should be able to approximate it.

As usual, I learned a lot of stuff I didn't know by watching both videos. I am going to try the UDK tutorial first since I need the Earth working in UDK but I think there may some additional value to creating overlapping spheres for the clouds and atmosphere. This will require more rendering but I don't have a lot going on out in space so it should be fine.

I will post my results here.

Step 1: The first step is to find a level of detail that feels realistic. Something this big requires a lot of detail. The blender model used a texture that is rectangular. I resized it into two 4096 squares. I then mapped those 2 textures onto one sphere. That took a while.


hmmm. I'm not sure about that level of detail. I know it it will look a lot different when I'm done but I'm not sure that detail is going to cut it. Just those 2 images and the mesh = 52MB udk package. If I map the sphere onto 4 images that will push it up to 100MB. Double that for night time. 2 more images for bump maps and 2 more for clouds gets me to 300MB. Really pushing it but possible.


As I started working on this I saw this month's discover magazine cover. This is an interesting idea:

Anyway...

The blender video author said he had to reduce the quality of the image by half. This was an incorrect statement. It took a few hours to map a sphere into 3 segments. Here is the result:


So now I have a sphere broken into 2 segments and another sphere broken into 3 segments. This should allow me handle all the images.

Now to see what this looks like in UDK with the 3 night image segments:


It looks good at this distance but up close it has all kinds of compression artifacts. I will do some more detailed searching for better non-artifacted images later. The important thing is to design it with 3 part images to maximize quality.

Here is the bump map I am going to use:
http://www.blenderguru.com/wp-content/uploads/2011/06/Bump.jpg

I will break it into 3 segments of 4096 a piece. I have no idea if I will be able to use a multi-part bump map but we will find out.

Here is what the left-most segment looks like in crazy map. Per the UDK tutorial I have given more emphasis to the finer details:

After thinking about this for a while I believe breaking the sphere into 3 areas is the wrong approach. I need a perfect sphere mapping for 1 texture. I think do the 3 part break-out within the texture itself.

Here is the material segment for doing this trick:


Notice that the image has lines at the joining point between the 3 textures. I've gotta sort through that after lunch. I think I need to expand my masking area and maybe gradient transition a bit.

Here is the result in game:


Looking good. No clouds, lighting or atmosphere but I am able to build a giant 3-part texture for a sphere.

Stitching 3 images in a material is a total pain. I think I spent 4 hours getting 3 images to line up in 1 material. I may go for 4 images when I am done.

I found uber large images and rebuilt my night & day images from them. Here is what it looks like with day and night added together with a normal map:


Now lets add in the fresnel (feeding the normal into it) and enable smooth shading on the object in blender and reimport it:


Limitations so far:
As I seem to be apt to do, I have ran into several limitations:

1. The size of my earth-only UDK package is 354MB. This contains the earth images along with the mesh:

2. There is a limit to the number of texture samples you can have in one material. When I try to add in clouds or the specular mask I hit it. To get around this I am doing 2 things:
a. I chose make the specular mask a single image. This is a problem since my solution to linking the 3 earth images together was to slightly stretch them. this causes the specular mask to not perfectly align with the land masses. We'll see if I have to skull sweat through a solution to this.
b. clouds are going in a separate mesh. This is what the blender tutorial did. I'm not sure this is a doable solution. We'll see.

I am also have trouble with the light vector (it isn't working). I built a new map this morning to see if the problem would go away.

Update...
I gotta say I really hate the seam between multiple images. I can not make it go away. I was so desperate I tried to put everything into 1 image that was 16384x16384. That exceeded UDK's max size of 8192x8192. I think I am going to go for broke and make the earth images 16384x4096 broken into 2 parts of 8192x4096. By reducing the seams to an even number I may have a chance. The day, night, normal and specular should fit into one UDK package. The clouds will have to go into a separate package. The upshot of all this (if I can pull it off) is that I will be able to put more logic in my Material because each image is a composite of 2 texture, not 3.

Never give up. Never surrender.
I finally got a seamless earth at 16384x4096 for each image necessary (2 parts of 8192x4096 for each). I gave up doing the merge in a material. I went back to splitting a sphere in half for UV mapping and figured out my seam issue: the UV was mapping too close to the edges. I rescaled each side to 99.9% and that brought in the mapping just enough to lose the seam. Now I can finally play with making the earth with high resolution. Here is a snapshot (nothing fancy yet):


This image has a day, night and a normal fed into a fresnal. It does not adjust night to not show based on a lighting vector. I had trouble with that last night and expect a lot of effort to get that working.

Update: 6/3/2014: clouds
I've been so busy I haven't had time until late tonight to work on this. I built the cloud & normals textures. I then added just the clouds to the left half of the earth with a panner to cause the clouds to move across the earth.

As usual, this is not going to be as easy as I hoped. Even though I am mapping clouds onto half of the earth, each side needs the full amount of clouds to scroll across them. This means I am back to melding the clouds textures together. I am hoping seams in the clouds texture will not be as noticeable since they are B&W and pseudo random in appearance and distribution. We shall see...


Star Citizen Planet
I'm keeping my eye on what current games do for planets. Here is Star Citizen's earth-like planet:


A couple of observations:
1. They have chosen to have no lower planet detail letting the clouds be the focus.
2. Their fresnal is floating above the planet
3. I suspect the clouds are not moving and that you are only seeing one side of the planet. ie: the planet is not a sphere but just the front section of one.
4. Their fresnal blue is much lighter and closer to the color of the clouds

Clouds on their own sphere
I removed the clouds from the Earth texture to prevent having to meld the textures in a material. They are now in their own texture mapped onto a sphere slightly larger than the earth with a slightly faster rotation rate. I also adjusted the fresnal color to be lighter. That will need to go into its own sphere too.


UDK Can't Handle it
Well crap. I hadn't looked at in the rift. I'm getting a rendering issue with trails of images not clearing out as I move my head. I've seen this once before on an experimental board. I think I'm boned. I removed everything except the night image and the problem persists. Damn that is disappointing. Maybe UE4 does a better job.

Where I found the images for the earth:
1. day: http://visibleearth.nasa.gov/view.php?id=74518
2. night: http://earthobservatory.nasa.gov/NaturalHazards/view.php?id=79765
3. bump/normal: http://visibleearth.nasa.gov/view.php?id=73934
4. clouds: http://visibleearth.nasa.gov/view.php?id=57747
5. specular mask: http://www.blenderguru.com/wp-content/uploads/2011/06/Spec%20Mask.png

Wednesday, May 28, 2014

Reworking the Atari 2600 Adventure maze

I need to rebuild the crate maze so it is lit better and matches the proportions of the Atari 2600 Adventure maze.

With a bit of cut & pasting, this is the layout of the Adventure Maze. The only thing different is the connection from the green area into the maze.


I am contemplating abandoning the crates in favor of walls and floor that match the exact color of the aventure maze. I need to see if that looks good and isn't a performance hog.

Maze images courtesy of:
http://nerdtrek.com/retro-gaming-adventure-atari-2600/

The Stacks Unlock Secret

Since the egg has been found, here is the secret to unlocking the entire game:

The first clue is a variant on the secret in the book. Cut out letters, but the side of the cut out matters. Left cut-outs = maggot
Right cut-outs = brain

This is meant to lead you to the maggot brain album. There is a second clue there:

And finally do this to reach the secret area:

That gets you the copper key, but there is a hidden secret with the secret room:

This gives you everything. keys and cubes.

The easter egg is at the end of the final board. You will have to do some special jumping to reach it.

Here is a clue: forward, forward, up, up, double up & forward.

I really don't want to spoil the ending for you, so go get that egg. I promise you it will be worth it.

The secret full-unlock will be hidden somewhere else in the final game so this trick will only work in this version.

Tuesday, May 27, 2014

Fixes to the stacks in the upcoming weeks

I've been paying close attention to users experiences with the stacks and have compiled a list of stuff that needs fixed/improved before my final release to Oculus.

Remove those cubes
In my head, it sounded like a good idea. A way to encourage the player to explore the boards. In reality it is a tedious mechanic. Better to have a game that plays in an hour all the way through than a game that takes days to find stuff. I will still have the hidden keys and egg but those cubes have to go.

Fix the flashlight
The flashlight doesn't have a mesh and it was causing UDK to spew out log errors. I got a million log lines in 15 minutes which reduced the run speed by half. I pulled it to remove the log errors but that made some parts of the game really hard.

Improve the Stacks Maze
That was the first thing I ever lit in UDK and it is way too dark. The problem is that I accidentally lost the original blender object file for the crates and they have no light mapping. I will have to rebuild that mesh from scratch. I may rebuild the entire maze so that it proportionally matches the adventure 2600 maze in addition to just the flow of it.

Move the Stacks respawn point
Falling off the ledge and starting back in the maze was unintentional and can frustrate anyone trying to reach the clouds.

Allow customization of jump, run & view navigation
I need to allow people to customize the experience to make it more comfortable (if that is possible)

Provide clarity to confusing game elements
Prevent the user from accidentally replaying intro or resetting their game. If I remove the cubes I may not need a "new" option anymore.

Work on improving the Stacks map performance
I will probably need to regenerate it with even smaller ring segments.

Fix some miscellaneous bugs
There are some clipping area issues and a missing catch that need added.

Research the wireless controller issue
The wireless controller isn't working for everyone. I'm not sure what is going on there. I can't reproduce it but I will do more research on it.

If you have any other issues/problems that need address (besides vertigo and run speed) drop me a line here or on reddit.

Monday, May 26, 2014

Ready Player One "The Stacks" game download available


After a year and over 2000 hours of development “The Stacks” is ready to play.


The install is 637 MB (668,174,578 bytes)


Game Trailer:


Exactly what is the stacks? 

The Stacks game is an homage to VR and science fiction movies. It is composed of 8 areas linked together through a hub:

 HUB


INTRO


STACKS


MATRIX MAZE

1000s OF CUBES


TRANTOR

TRANSPARENT STACKS


CREDITS


FINALE


What is the goal?
You need to collect 90 QR cubes. Cubes are found in all areas except the end. Some are easy to find while others may take a bit of searching. I have tried to help you out in 3 ways:
1. When you approach a cube it will play a sound-loop. 
2. Each collected cube will display on the wall in the VR room entry way. 
3. When you collect all the cubes in an area, the game will play a success sound. A color mural of the area will also display in the VR entry way. 

Finding the way out of a level
On Trantor and Space, if you fall through space at the bottom you will be teleported close to the entrance/warp. You can't die in this game so don't be afraid to fall off edges.

What about secrets?
In keeping with “Ready Player One” there are 3 keys and an egg which unlocks a special ending. The copper key is particularly well hidden but if you've read "Ready Player One" you should be able to puzzle out how to find it.

A bonus for early players:
The first person to unlock the special ending will be included in the end credits of the game that I will submit to Oculus. For proof, email me (3rd.foundation@cromagnon.com) a screenshot of each key, the egg, the special ending and an explanation of how you reached the copper key (I am trying to prevent cheaters). Then tell me what name/moniker you want included in the end credits. The moniker/name needs to be clean/kid-friendly (ie: not “big wang 69”).

Update: 5/28:
We have a winner: RiftingFlotsam has found the egg. I will add his moniker into the end credits of the game.

Bugs & Issues:
It's just me building & testing this thing. I imagine there are issues in the dark recesses of the game. If you find one, drop me a note telling me how to reproduce it.

A note about the New & Intro:
1. The New area at the entrance of the hub will reset your game putting you back in the intro. Don't do it! :) I will work on making this clearer in the final version submitted to Oculus.
2. The "INTRO" warp room in the first area will take you back to the start of the game (keeping your cubes in tact). So if you don't want to do that again don't go there... but there may a few things to collect there...

If you don't have an Oculus Rift, you can still play the game:
You need to make a simple adjustment to a configuration file:
Edit C:\UDK\The Stacks\UDKGame\Config\UDKEngine.ini

look for:
[Engine.Stereo3D]
bEnabled=True

change :
bEnabled=False

Final Note:
I did a complete play through of the game to make sure you can collect all cubes, keys and egg. The Trantor loading board blew up on me and I had to restart the game. I think that was a strange non-repeatable issue because it was fine after restart. I also had to disable the flashlight because it was spewing out log errors slowing down the game performance. I didn't want to hold back the game because of the flashlight. I will fix that before releasing to Oculus because it makes parts of the game unusually hard. Besides that, everything went smooth.

BTW...
I don't know if google drive has download limits. Dropbox did and locked me out once. If this download gets pulled, message me here or on reddit (http://www.reddit.com/user/3rdfoundation/) and I'll put it somewhere else.

----------------------------------------

Full Game Unlock Here:
http://oculusdrifter.blogspot.com/2014/05/the-stacks-unlock-secret.html

----------------------------------------

Issues to be fixed in the UE4 Port:

Thursday, May 22, 2014

Polishing Game Elements

I did a play through of my game 2 nights ago and took notes on what was boring, too difficult or caused too much neck strain.

It is painful to have to revisit stuff but I don't want a game I wouldn't enjoy playing or put down in frustration.

Some changes I made:
1. I added sound around each QR cube you need to collect as a hint you are in the vicinity.
2. I added status tracking on the 2 boards with the most QR cubes
3. I rebuilt my space/cubes board to ease entry, added an element of surprise and 5 rotating rooms.

Here is what the cubes board looks like now:


Abandon all lunch ye who enter that eye.

And, if you are wondering what is taking so long...

My current punch list for finishing the game:

Critical:
[ ] add catches & barriers in all boards
[ ] disable intro fan volume once top reached until reaching bottom again
[ ] build a special mesh in blender for cubes area blocking
[ ] change intro orientation
[ ] remove the momentary blue flash at start of game (use sphere)
[ ] update cube count upon collection (hub/stacks/trantor)
[ ] lock up credits end
[ ] hide/show "fade column" (currently visible in stacks)
[ ] add better instructions to intro
[ ] remove second text from intro

At this point I need to produce a working build for Ernest Cline (due this Saturday)

Need Fixed:
[ ] bullet proof intro final audio logic
[ ] animate moon logo
[ ] fade out music on all boards when leaving
[ ] kill velocity coming into boards from loading boards
[ ] fix loading eye lighting (if even possible)
[ ] fix foundation art year
[ ] add lamp A
[ ] hide/show crane cubes with crane
[ ] update locks to match door locks
[ ] "hide/show" elements instructions (stacks)
[ ] improve new : sphere & jump you to start again
[ ] restrict player on initial load screen

Nice to have:
[ ] rebuild egg mesh
[ ] add moon face animation
[ ] disable stacks run/jump until top reached

When these are done I will probably have more but that is my complete outstanding list. No new boards, just a bunch of grunt work.

Wednesday, May 21, 2014

UDK : Creating a sound you can find and turn off via unrealscript

The player in my game collects QR cubes. One way I help the player find them is by playing an audio loop when they get near one. Once the cube is collected, the sound goes away.

There was no way I wanted to do that in kismet. That would take a long long time.

After a bit of digging through unrealscript actors I found just what I needed:

AmbientSoundSimpleToggleable

I drag the actor onto the map and place it where the cube is. I then tag it so I can find it:
QRSOUND000 : the 000 = number of the cube.

Then in my code for updating the map once a cube is collected I do this:
    // enable/disable sound for qr cubes : ex : QRSOUND016
    foreach AllActors(class'AmbientSoundSimpleToggleable', sound) {
        if (Len(sound.Tag) == 10 && Left(sound.Tag,7) == "QRSOUND") {
            qrCode = int(Mid(sound.Tag,7,3));
            if (gameState.hasQRCode(qrCode)) {
                sound.StopPlaying();
            }
            else {
                sound.StartPlaying();
            }
        }
    }

Voila! cube sound modified on the fly with no kismet.

The best thing is you can adjust the min/max radius and volume of the sound in the editor. Best of both worlds.

Monday, May 19, 2014

Camtasia into Premiere Workflow

There are a few hoops I have to jump through to get a video from Camtasia into Premiere so I thought I'd document the process.

1. capture the video
2. save camtasia file. This will then open up the camtasia editor
3. right click of the camtasia file and extract contents. Now you have an AVI and a bunch of other junk. I don't care about the audio or cursor stuff so I just delete everything except the AVI.
4. drag the AVI into prism and convert it into a high quality mp4.
5. import the mp4 into premiere and you are good to go.

Note:
If you do not convert the avi into mp4, premiere will stutter horribly on the avi. The avi plays fine in windows media player but premiere is not happy with it.

Sunday, May 18, 2014

Ready Player One Stacks Game Trailer

I just finished the trailer for my game. First time I've cut a video to music. That was a lot of fun.

The game should be finished in a few weeks.


The Song for the trailer is Hauntin' Me by Keep Shelly in Athens


Saturday, May 17, 2014

Camtasia : User beware

I started playing around with cutting my own trailer yesterday evening. Since Camtasia did such a great job capturing video I thought I try using it to build my trailer.


That is when I ran into a variety of issues:
1. It can't use its own mp4 file to produce another video. Seriously? The only way I can produce a final mp4 of my video is to preview it in camtasia and capture the preview using camtasia. I was actually ok with that. Not an optimal solution but I could work with it.
2. I am now getting "unsupported audio stream" on some of the files that work just fine if re-imported into a new project. This causes camtasia to crash. The only way around it is to move the camtasia captures out of the way, open the project and reimport them. Even then the project is very unstable.

My project only has about a dozen videos and a couple of audio streams. I'm not talking about some crazy project.

Fortunately I had cut an mp4 video of the first half of trailer before camtasia fell apart on me so at least I have a reference. I need to find another program and rebuild it from scratch. Thank you Camtasia for that.

So... Camtasia is great for capturing a video and saving it. I would not recommend doing anything of substance in it.

Here is someone else who had the same issue:
https://feedback.techsmith.com/techsmith/topics/_invalid_or_unsupported_audio_stream

UDK : disable head bob

I am working on some trailer videos captures and the head bob ruined any fast moving captures.

It is actually quite easy to turn off:

DefaultGame.ini:

[UTGame.UTPawn]
Bob=0
bWeaponBob=false

...

now to recapture fast moving game segments...

Monday, May 12, 2014

"lighting needs to be rebuilt" UDK nag

I am so tired of the "lighting needs to be rebuilt" message on my screen:


I am constantly moving stuff and the lighting on a couple of my boards can take upwards to an hour. Even on my maingear monster.

I need vid caps from my game to build a trailer and these messages have to go.

Fortunately they are easy to remove.

In UDKEngine.ini adjust this setting:
[Engine.Engine]
bSuppressMapWarnings=True

restart UDK and voila, no more nags.

This is for UDK 3. I'm not sure if this applies to UE4.

Sunday, May 11, 2014

Unrealscript: repeatedly calling a function when button is down

I use the dpad on the xbox controller to increase/decrease max jump height.

There are 20 height levels. Making the player press up/down 20 times is not a good option. I needed to fire off the increase/decrease function as long as the button is held down.

I thought this was going to be very painful. It turned out to be really simple via timers.

The code I found on the web recommend 1 function that toggled on/off on press/release. Relying a pressed/released call every time is dangerous. I built a stop into the jump height logic itself in addition to reacting to the press/release to stop an out-of-control timer.

Here is the UDKInput.ini mapping:

Bindings=(Name="XboxTypeS_DPad_Up",Command="IncreaseJumpHeightViaButtonPressed | onrelease IncreaseJumpHeightViaButtonReleased")
Bindings=(Name="XboxTypeS_DPad_Down",Command="DecreaseJumpHeightViaButtonPressed | onrelease DecreaseJumpHeightViaButtonReleased")

Here is the Unrealscript called via the UDKInput.ini:

exec function IncreaseJumpHeightViaButtonPressed() {
IncreaseJumpHeight();
SetTimer(0.1, true, 'IncreaseJumpHeight');
}
exec function IncreaseJumpHeightViaButtonReleased() {
ClearTimer('IncreaseJumpHeight');
}

exec function DecreaseJumpHeightViaButtonPressed() {
DecreaseJumpHeight();
SetTimer(0.1, true, 'DecreaseJumpHeight');
}
exec function DecreaseJumpHeightViaButtonReleased() {
ClearTimer('DecreaseJumpHeight');
}

Here are the "private" methods called via timer:

exec function IncreaseJumpHeight() {

// do work here...

if (jumpLevel < maxLevel) {
jumpLevel++;
UpdateJumpHeight();
PlayJumpHeightSettingSound();
}
else {
// This prevents a runaway situation
ClearTimer('IncreaseJumpHeight');
}
}

exec function DecreaseJumpHeight() {

// do work here...

if (jumpLevel > 0) {
jumpLevel--;
UpdateJumpHeight();
PlayJumpHeightSettingSound();
}
else {
// This prevents a runaway situation
ClearTimer('DecreaseJumpHeight');
}
}

Saturday, May 10, 2014

Closer and closer

Credits are almost done. I need to do some animation and add some triggers to catch the player. I really like the look of the end of the credits:


I created a new opening map. It is only 35k versus the old trantor one (17mb).


I hate discarding work but I just didn't have the time to do the original Trantor opening justice. It wasn't complete, it didn't feel polished and I want the start of the game to look polished.

There are so many little things left to do:
adding clipping to a few meshes
animating credits
adding cubes
removing run/jump restrictions
preventing the player from escaping any level boundary
adding locks on hub doors
etc...

Thursday, May 8, 2014

2001 meets Close Encounters


At the end of the credits I wanted you to walk through a door and fall onto a landscape through clouds.

It quickly became apparent that, as usual, my appetite for design outstripped UDK's capabilities. There was no way it was going to render properly and I would have had to deal with enabling fog and dominant lighting on the fly.

Then I had the idea of moving the landscape into my credits area instead of having it outside. With a bit of adjustments this was the result:


I realize it is a super plain landscape but it coveys the idea I wanted. I could screw around with this landscape for a week with a fancy material but sometimes simple is better.

Adding this landscape took the lighting build time from 8 minutes to 50 minutes. I think it is because of log output. I need to try rebuilding lighting without the log window enabled.

Looking good:


The credits level is almost done. Took about 2 weeks.

Wednesday, May 7, 2014

Demo of the game to a 6th grade class

I gave a presentation and an Oculus Rift demo to my daughter's 6th grade class today. I talked about how I built the game using photoshop, blender and UDK and fielded a variety of questions.

I showed them the areas of the game (below) and they chose the Trantor area to explore.

All of them were very excited to try it and nobody was affected by running fast or jumping high which was a great.

I will be returning to do a blender tutorial with them and a follow up at the end of the year so they can see what they build in the Oculus Rift.

I am continually amazed that kids rarely get VR sickness from using the Rift (at least to everyone I've shown it to). This is not the case with adults

One of the kids later told my daughter that they were going to have their parents buy an oculus just so they could play my game all day. That was very nice.


Areas of the game they had to pick from:


opening


intro


hub


the stacks


matrix maze


lots of cubes


transparent stacks


trantor <-- they picked this area


credits


the end