Tuesday, June 24, 2014

Learning by Replicating - Part III

Part 3 in an ongoing series to replicate a scene by evilmrfrank.

----------------------------------

I adjusted lighting more to remove errors
> increased Environment Intensity to 5 (this brightened scene considerably)
> adjusted radius of each light to not overlap

From this point out I'm only going to note things of interest

Add fog actor (BP_FogSheet) on the left, right & center
> he adds a lot of fog

I adjusted ceiling rocks to show off more of the above area and the fog within it

transparent selection: quick settings:allow-transluscent-selection

he adjusts the post processing volume
> scene color: source color tint: H15,S.238,V.69


------------------------------------------------
6/25/2014
------------------------------------------------

@ 7:45:05 : added 4 flowing water volumes:
M_Mod_WaterFlow_DCL_Master
> originally copied from default cave demo

He add BP_GodRay
> light rays coming straight down (pretty cool)
> radiates out from rotation point
> he goes to a lot of trouble to put it on the statue and then whacks it.
  > it is very finicky and only shows up at certain viewing angles.
> I kept mine in the cavern, increased intensity and left it animated

rift check : looks good

adds another ceiling rock on upper right: I didn't do that
adds GDC2012_Throne_Interior_Chain_05 on left & right (sc 2.5)

adjusts lighting on far right of cave to highlight rocks

I increased the intensity of my back interior lighting from 2000 to 6000

add 2 ivy copies on to upper left part of closet beam
add 2 ivy (SM_Cave_Ivy_01d) on left bottom side
add 2 ivy on right covering brick-rock & rock it sits on
add 1 ivy on lower left covering brick-rock

add 4 buried bricks (various small scale & meshes) in ground left of stream

add 2 colums at back and add rocks to cover top edges

@ 9:23:14 : man that is looking great


add ivy on left in bricks

he starts adjusting lighting in back of cavern. I'm happy with where I'm at.

add dust particles in god light
> Effects/Particles/Dust/PGPU_Dust_Vec_Large (sc 3 - he was 2.5)

add water falling into stream
> Effects/Particles/Water/P_Drips_Splash_Ripples
> I scaled to 1.3 and put right behind beam as if it is falling off of it
> I slowed it down a bit as well

At this point he add fire on the left. I'm not digging that.

I spent about an hour tweaking it so it looked good in the Rift

Done for the day


@ 9:49:00

I copied fire, sound and rocks round it from the Cave Demo
> I brightened up the light a bit
> I changed the color of the fog on the left by the fire to be orange

I added sound to the dripping water and ambient cave wind sound

He plays with the atmospheric fog
> start distance: 15000 -> 100

He plays with light source
> adjusts color to be slightly orange (H23,S.18,V1)
> lighting needs rebuilt
> this is like a warming color filter in photoshop.
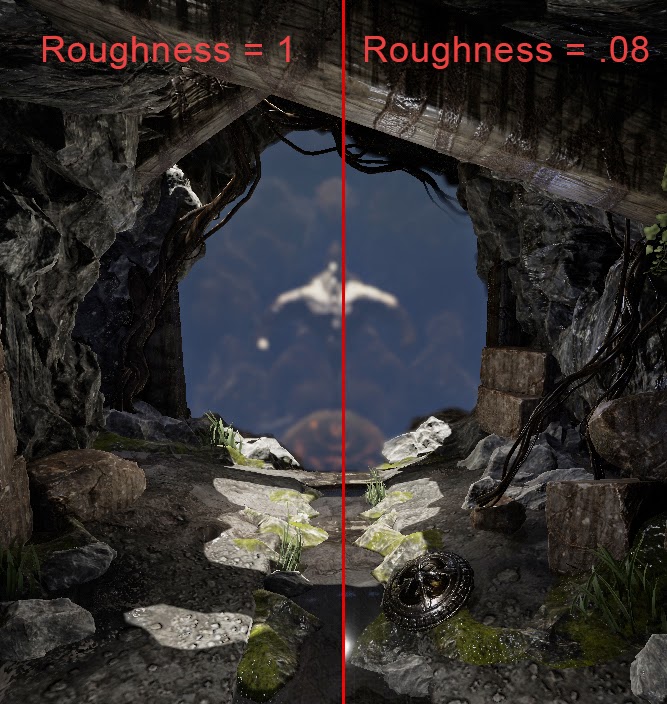
  I toned it down to a saturation of .07. I didn't want to blow out
  the blues we work so hard on

Adds an exponential height fog outside of cave.
> he adjusts it a while and then whacks it

copies fog by fire and puts in outside cave
> scale it up. increase noise, brightness and panning speed to .01

adjust a few rocks and add vines on the left

@ 10:55:16


Comparing these last 2 images, it feels like a step backwards a bit. I think the adjustment to atmospheric fog lightened the scene too much. I need to revisit that later tonight.

6/27/2014

I adjusting fog and lighting to get the scene back to the prior look while keeping some of the new changes. This was the result:


Having done a ton of photography I've come to stray away from warming filters and to strive towards greater depth in lighting variation. The orange is a little too intense so I need to tone that down a bit.

 I neutralized the open area color and darkened the back area:


Yea, that's just about right. Off to work...

@ 10:55:16

add more rocks and grass on both sides
adjusts lighting
he grabs a god ray for the ceiling from the cave demo but I have one already
add a sword & fog from below outside
add another vine on the left and call it a day!

Here is the final scene

full screen

rift view

I will add movement to this in a week or so and post it as a mini demo for people.

Thursday, June 19, 2014

Learning by Replicating : Part II

This is part 2 of an ongoing series of posts on replicating a scene by evilmrfrank

Part 1 : http://oculusdrifter.blogspot.com/2014/06/amazing-ue4-tutorials.html

adjust light source rotation:
129.4, -84.37, 90

slide further ceiling rock further along x axis: 383630
slide closer ceiling rock further along x axis: 179640

build lighting (that darkens things)

return to light source via scene outliner.
> we are concerned with lighting of statue
> adjust light source angle to 3

select statue
> override lightmass resolution from 64 to 512

build lighting

go to world settings:
lightmass:lightmass settings
> use ambient occlusion
> environment color: gold (H=35,S=.244,V=.79)

return to light source via scene outliner.
> rotate in bit in multiple axis

build lighting

He rearranges the ceiling tiles to have light fall on the statue so the head is lit the way he wants it


go to modes:placement:volumes
> lightmass importance volume
> expand this just around the scene (not the walls or statue)
  > he switched to geometry editing mode

create a copy of the left rock wall in the scene
> move & rotate it so it covers the back (behind camera)

create another copy and place it on the right so that it is barely with the bricks and touches back

create another copy and rotate & place it so so it becomes the ceiling of our scene
> I gauged the final position based on how light fell onto the floor of the scene
> I also made it so you couldn't see it in the camera


back to scene object adjustment (whew!)

adjust 4 of the rocks on the left
add Rocks/SM_Cave_Rock_Small_01b on the left

He starts digging through colors to paint onto the floor again
> he settles on H300,S1,V1
> he paints portions of the left side with this.
  > this has a distorting effect on the land (sinking it a bit)

FLOOR COLORING REVIEW:
channels RGB (no alpha)
> BLUE       = pebbles
> GREEN      = pebbles water
> YELLOW     = stone water
> PURPLE(RB) = stone

He wants stone floor near the bricks and pebbles near the water

Here is how the paint is put onto the floor:

@ 2:56:24


------------------------------------------------

Add SM_Cave_Rock_Large_01b to left of scene behind furthest bricks
copy to the back right side of scene

Add point lights by back rocks

copy ceiling rock and rotate it so it is on the left side of scene
> remove a brick it overlaps

copy SM_Cave_Rock_Large_01b_2 from left of scene onto floor
> click on floor and select "paste here"
> scale to 200 on position to the back left of the statue
> copy and place right of the statue (rotate 180 degrees for symmetry)

rotate the statue back a bit and bring it forward so the face is in the light
> this looks really good

He starts replacing the large walls with lots of rotated copies of SM_Cave_Rock_Large_01b_2
> I rebuilt lighting to see if this was important. It is. You can see them so I need to follow along...

@ 3:07:14

------------------------------------------------

rock:
pos = 290225,-114090,-94560
rot = 78.8,-7.56,-97.1
sca = 200,150,200

@ 3:16:15

------------------------------------------------


Bring the large left wall back 

Add another ceiling rock so that it doesn't shade the scene and rebuild lighting

Back to scene with slower movement speed

Add SM_Cave_Rock_Med_01a
> scale 2:2:2
> put rock so it it is at the back left covering the edge
> create a 180 degree rotate copy on right side

adjust rock above statue (not sure why)

create another ceiling rock copy moved behind where scene is
> keep light that falls onto scene floor in-tact


Time for another comparison check (his on top, mine on bottom)


I used his image to adjust a few of my meshes to better match his layout.

create a copy of large left wall, rotate 90 degrees and block behind scene

copy left rock in scene (SM_Cave_Rock_Large_01a) wall to right side
> scale: 1:.75:1
> position to fill gap on right
> create a copy higher. rotate and adjust position a bit

adjust several bricks
> he makes a copy of one on the left and swaps it out for SM_Cave_Brick_01c
> he then uses a scale of -5 on the z axis which inverts the mesh. COOL TRICK
> scale : 4.5:4.5:-4.5

copy far left scene rock twice rotating it to make a visible arch

adjust the beam (and brick supporting it on right) to better show off the arch

------------------------------------------------

@ 3:48:18

select light source
> indirect lighting intensity : .1
> this makes the interior of the scene slightly darker

hide sprites and move bricks around

copy rock from back left into arch to smooth it out

I adjusted my scene a lot to match his lighting as much as possible
> He wants v-shaped lighting over the stream


Adding foliage:
Meshes/Foliage/SM_Cave_Ivy_01
> scale 3:3:3
> hang off beam on right side

world settings:
> environment color: H:220, S:.503, V:.792

plug up lower hole in back of scene with rotated copy of back wall

adjust a few bricks on the left

add another ceiling beam on left side.
add 2 more vertical beams, one embedded on each end of the scene

@ 4:21:12  : I tested in in the Rift. It looks great.


------------------------------------------------

He didn't like the environment color and changed it:
H:37,S:.31,V:.715

Override the lightmap resolution on everything to 512
> select all static mesh only
> that slowed down build time significantly (10 secs to 5 mins)
> I put it back to 64. It makes a difference in the end but not
  significant enough during level construction to justify build time
> he continues to construct the level while lighting build going on via un-lit mode

Add SM_Cave_Grass_01a (sc 3) on far left
Add SM_Cave_Vine_01c (sc 2) along arch (pivot point on vine is bad)
> adds a copy of it and does a transform along x axis (I think he wanted y)
> not having the rotation point in a good spot TOTALLY sucks.
> actually got the copy to hook over the beam. I'm keeping that!

4:49:26 : It gets tough here.

He copies a few elements from the cave demo
> He seems to copy a lot more than 3 items.
> I copied SM_Cave_Rock_Large_01b52, SM_ROC_TalonStruts_TopFrontA04278, M_Mod_WaterFlow_DCL_Master_2

World Settings:
> Environment Intensity : 1 -> .25

Adds Rocks/SM_Cave_Rock_Slate_01a
> quickly uses SM_Cave_Rock_Large_01b52 to get meterial (mag glass) and apply it to the new row (via arrow)
> leaves that hanging in middle of scene

adds a snow drift (01b) and changes material to same rock material above
> scale: .5 & place on right behind brick on floor

adds a snow drift (01a) and changes material to same rock material above
> scale: .75 & place on left along edge of bricks, half buried in floor
> add another and leave in middle

move right snow drive towards camera

paint all snow drifts blue (green mossy rock)

rotate second 01a snow drift on left in the rocks at the end (that looks good)

(I'm a bit picky about not having any part of the drift floating above the surface.)

make a copy on the right side

rescale grass on right to 5 & move into moss rock on left

.... I think light in main area has been removed from the scene. His is much darker than mine ...
> dropping the intensity on it from 5000 to 2000 for now

I adjusted the ceiling a bit to add another small area of light on front left

Add 2 bricks on the right

@ 5:25:01


------------------------------------------------
6/23/2014
------------------------------------------------

Add a post process volume (I already have one set to unbound
> I think unreal blew up on him
> enable all depth of field values
> Method         : Gaussian
> Focal Distance : 0
> Focal Region   : 1800
> Near Transition: 0
> Scale          : 1
> Near Blur Size : 0
> Far Blur Size  : .1

That looks pretty good in the Rift. I think it needs some adjustment, but very nice.

rotate a few bricks on the left.
add a brick copy on the right (sc 2)
move rock on left and place grass next to it (sc 4)
> rescale rock .75:1:.75
create copy of rock in front of it (1.25:1:.75)

copy rock 2 times, make smaller and position along stream
copy moss rock/snow-drift on left twice and position along stream on each side by rocks
add another rock on left along stream

copy mossy rock on left bricks to right, flip y and position along right bricks
add a rock and grass on right

@ 6:09:09


add war spoils shield on right of river (sc 2)
> add another moss rock section by it and a rock in front of it

I think he moved another view of the scene onto a second monitor

Add a point light in center and slide to lit area of stream
> color: H33,S.383,V1
> intensity: 500
> show all advanced details (eyeball in upper right of detail pane)
> use inverse squared fall off : unchecked (it got bright!): I like that look
> change intensity to .2
> attentuation radius: 1024
> I think he is changing work detail lighting settings off screen
> The effect of all this is very subtle: a slight orange tint to lit stream area
  > I guess he wants to enhance the lit area a bit

drag a sphere reflection capture into area
> above stream near shield
> influence radius = 512

copy that and move towards end of stream outside radius of first one

copy end of stream one and move it to upper left area
> influence radius = 768 (encompasses prior one)

@ 6:33:15

shrink the far right upper brick a bit

adjust the original light:
> color = blue
> intensity = 500

copy that and move it to the opening on the far left

At this point I have 2 overlapping lights (red Xs on them)
> copy again onto right side

Jist:
orange tint in lit areas
blue tint in dark areas

I added 2 white point lights to lighten up the cave to look like his

Tried in Rift again.
> it looks good but the frame rate is bad.
> reflections of light on the later is annoying too.
  > roughness of 1 removes this


A low roughness makes the scene look better overall but those reflections in the water are very annoying in VR.

I think several things are adding to the slowness of this scene:
1. light roughness
2. reflection captures
3. overlapping lights that cause lighting to switch to dynamic
4. distance blur

Once I am finished with this scene I will work on finding the optimum settings for performance.

Saturday, June 14, 2014

Learning by Replicating another's work

This video is amazing:


I was looking for melding multiple textures on a single mesh in UE4 when I stumbled this 15 minute walk through on building a scene.

I've decided this guy has the mojo I need to build better games. If he can do it in 4 hours, so can I with a lot of research and some practice.

I am going to pick this video apart, replicate it step by step here and provide notes on how it is done. I fully expect it to take me weeks to do this, especially since I don't always have a lot of free time.

To make sure I didn't miss anything I downloaded the video via jdownloader2 and brought it into premiere. I am then walking through it frame by frame. It is tedious but I want to replicate his workflow and learn a few tricks along the way.

------------------------------------------------------------------------
6/14/2014 - Saturday
------------------------------------------------------------------------
Getting Started
1. download and open the cave example
2. create a new level
3. set up for Oculus Rift:

This does not add any special movement beyond flying but that is fine.

move snap: 5
rotation snap: 2.812
scale snap: .25

Adding a few meshs and setting up the camera

Add:
Environment:Meshes:Rocks:SM_Cave_Rock_Large_01a
Environment:Meshes:Bricks:SM_Cave_Brick_01a (scale:5:5:5)
Environment:Meshes:Rocks:SM_Cave_Rock_Large_01a (scale:1:0.25:1)

Switch to unlit mode

Add:
Environment:Meshes:WoodStruts:SM_Cave_WoodStruts_01a (scale 2:2,2)

Add a camera actor and lock viewport to it. (pos -315:-15:220)
> position it so that scene we are building is in view
> unlock viewport and pin it so it stays up when not selected

copy the brick 5 more times
copy that section of 6 bricks to the right

13 seconds into the video, but I'm keeping up...


------------------------------------------------------------------------
6/15/2014 - Sunday
------------------------------------------------------------------------
Adding the cave statue and fleshing out area prior to export:

create a lot of copies of the brick so it is 5 high & 5 deep
> remove a few from the end

add SM_Cave_Statue_01 (s=1000:1000:1000)
> this scale was ridiculous to work with I did 20:20:20

move narrow sm_cave_rock_large_01a to left, rotate and position
> pos=105:-555:380

delete furthest column of blocks and floor

select furthest column on blocks and export

Landscape work in blender
I've never used proportional selection before. That was quite a learning experience.

How I did it:
1. create a plane and subdivide it by 32 in each direction. 
2. then scale it 2x in the x axis.
3. select the 6 center rows and pull them down using proportional selection. You can adjust the amount of the selection with the scroll wheel
4. I then followed along in the video making a series of adjustments to match his. 

The proportional selection tool isn't as nice as the one in 3d studio max so I had to be a bit creative with what I selected and the radius of the proportional selection.

The top is his work in 3d studio max and the bottom is my work in blender


Setting up landscape in UE4

Before exporting the landscape UV map it onto a texture and set the shading to smooth.
Export it as fbx at 100x (opposite of import of meshes which was .01). This will get it in perfect scale with our scene.

This next part is where some of the dark arts of UE steps in:
We want a material we can vertex paint onto. He spends a few minutes experimenting with materials and going back to the cave several times to figure out which material and paint color work. He tried red, blue and green with a variety of materials until he found the right combination.

He finally settled on M_Cave_Ground_Mud_Inst.

For the paint:
 paint color = blue
 > advanced: alpha = 0
 uncheck all channels except alpha
 radius = 256
 strength = .2
 falloff = 1

Drag this texture onto the landscape. The landscape is initally snowy. Paint over the entire surface and it becomes muddy. Amazing (to me at least) this looks really good.

Here is a snapshot of the final product and all the paint settings:


I will need to do more research into the material. I opened up the parent and there was a lot there. 

------------------------------------------------------------------------
6/16/2014 - Monday
------------------------------------------------------------------------
Adjusting land creek depth and adjusting bricks

Painting onto this:
 paint color = red
 > advanced: alpha = 1
 check all channels except alpha
 radius = 128
 strength = .2
 falloff = 1

paint down the middle with this. It is a water texture
> this mostly undoes the blue painting from above

He goes back to 3d studio max and reduces the depth of the water channel
> reimport narrow stream version

switch back to blue and paint portions of end sides to switch it to rocks

select beam and rescale it: 3.5:3:3
> rotate it slighting clockwise in the YZ plane and position end behind rocks on right

select half of the bricks on the right and swap them out for an alternate
> he used magnifying glass on mesh to quickly find it in the content browser

he did a similar operation on the left:


rotate and swap out individual bricks

STOPPED at 1:39:28

-------------------------------

Reposition more bricks on the left and right side.
> A few copies were made too

Add Rocks/SM_Cave_Rock_Slate_01a
> scale 1.5 and put on left side of river towards the end
> I think this is a marker for how far he wants the scene to extend to

remove center column on right and slide end bricks and wood beam to fill gap

return to blender and remove the 6 end rows shortening the length of the creek
> pull down the sloped section further
> redo UV mapping to fit texture

return to blender and pull slanted area back up


STOPPED at 1:58:18

------------------------------------------------------------------------
6/18/2014 - Wednesday
------------------------------------------------------------------------

Rock walls and ceiling

raise rock, scale it to 3 and change material
> he paint red, blue and green (RGB no alpha) onto the surface (which isn't visible on his first material selection)
> he then spins through the rock materials looking for one where the surface texture varies by color
> NOTE: you can see the color on the vertexes when you roll over the material!


He settled on M_Cave_Rock_Large_Moss_Inst & painted the lower portion of it so moss showed through
> with this material, it doesn't matter what the color is
> drag it out of the way on the left

add Castle/SM_Cave_Castle_Tower_01
> scale to 2
> drag far into the distance on x axis

make a copy of the left rock wall
> slide away along the x axis
> scale to 50, .25 (unchanged), 50
> push far away on left along y axis
> rescale to 300, .25, 300 (damn!)
> pos = 1835,-111655,380

@ 2:08:25

I'm going to take a moment at fix the statue so it is scaled correctly
> scale = 1000
> pos = 293280,-20290,
> damn that is big

OK, back to rock mojo

Make a copy of the rock wall and move it to the right side of the scene
> pos = 1835,99910,380

Just so you grok the size of the wall I zoomed out a bit for you:


Make a copy of the rock wall on the right pulling towards the scene
> this will become the lower bounds/floor
> rot = -90,0,-90
> pos = 1835,19415,-80360
> sca = 500,.25.500

readjust scale of walls
> 500,.25,500

create a copy of the floor rock and move it above the scene
> sca = 100,.25,100
> pos = -5775,19415,12720

To position he working view above the ceiling he changed the camera speed (upper right corner of editor) to 8
> that was a huge help!

find light source in scene outliner
> rot = 28.868,-46,129.45

(5)move the ceiling rock toward statue, rescale & rotate it
> sca = 300,.25.,300
> pos = 154880,19415,114320
> rot = 90,0,-16

(6)create copy of the rock ceiling
> sca = 300,.25.,300
> pos = 233375,-107175,114320

(7)create another copy of last ceiling piece
> pos = 290875,157326,114320

reduce of the scale of the first ceiling rock (5) along x axis
> sca = 200,.25,300

make a copy and slide towards statue
> pos = 354360,19415,114320


@ 2:21:12

Part 2 here: http://oculusdrifter.blogspot.com/2014/06/learning-by-replicating-part-ii.html

Tuesday, June 10, 2014

Fixing UE4 Defaults for Oculus Rift Support

There are a lot of oddities to configuration that needed adjusted. My hope is that this helps others starting to use UE4 for Oculus Rift development:

DOOR PROP SCALE
The scale of default door and frame are wrong. The door is 200cm tall. That is 6.56 feet. Doors in my house are 6.8 feet. This means you need it to be 208cm. That is a scaling factor of 1.04. That doesn't mean I'm going to use their door frame but if you are using that to gauge if scale is correct in the game, 3 inches is a big deal. I felt like my head was scraping the top of the door.

PLAYER HEIGHT
I'm 5 foot 8. The default height for a player is much taller. To adjust this go to the MyCharacter blueprint, click default and search for height. you want to set "capsule half height" to 1/2 your height in centimeters. My height is 172cm/2 = 86.

POST PROCESSING VOLUME
The next set of adjustments require a post processing volume. You can find it in "All Classes" if you don't have one. Drag it into your scene. search for unbound detail and check that so it applies to everything.

MOTION BLUR
There is a blur as you approach objects. This is an anti-alias method of temporal and it is super annoying. search the post processing volume for AA Method. Set that to none.

LENS FLARE
Lens flare has to go. Search for Lens and set the Intensity and BokehSize to 0.

AUTO BRIGHTNESS
Scenes in the rift get unusually bright. That is auto exposure. Search for exp. I don't know exactly the best settings but I am using min brightness = .5, max brightness = 1, auto exposure = 0.

IPD
The other thing that bothered me was the IPD feels different. Up to now I hadn't adjusted it on the DK1. UDK3 felt perfect. I had to adjust it for UE4 to make it not give me a headache.

INITIAL IMPRESSIONS
My initial impression with UE4 versus UDK3 is that it doesn't feel as nice in the Rift. UDK3 felt like Half Life 2 which was very 'crisp'. UE4 feels more 'fuzzy' like Unity. UE4 certainly comes packed with more flexibility but it feels like a step back for Rift support.

That is a start I will update this blog entry as I discover other things to make UE4 development easier for the Oculus Rift.

Monday, June 9, 2014

Hourences & UE4 Tutorials

I watched a lot of UE4 tutorial videos this weekend. I don't want to start work on my Tuscany UE4 port until I've absorbed all the information I can about UE4.


There is some weird new stuff with materials using masks. I don't understand it yet but the videos discussing the Infiltrator talked about it:
https://www.youtube.com/watch?v=-VANuJCM29E
https://www.youtube.com/watch?v=RURQSR788Dg
https://www.youtube.com/watch?v=Q_-LrvzhBhM


I was particularly impressed with Hourences videos. The environment materials, mesh construction workflow and kismet were insanely cool. Materials that always have grass on top regardless of rotation. Materials that adjust color based on water level. Elements that change appearance based on temperature and humidity. I was humbled. It made all my work with the Stacks look like child's play (which it was).


You can download his stripped down Solas project here:
http://www.hourences.com/

Here is the game website:
http://www.solusthegame.com/

Here are his videos:
https://www.youtube.com/watch?v=rxM6QVwrzBg
https://www.youtube.com/watch?v=eKB_jMcW2hg
https://www.youtube.com/watch?v=IXpyFxf66ac

I never have a ton of time to dedicate to this but I am going to dissect that project and take notes.

Sunday, June 8, 2014

Portals in UE4

It appears portals have not been included in UE4. Several attempts have been made to replicate the look.

This never fully worked in UDK3 for the Oculus Rift (the right eye didn't render). I would love to add portals into my maps but it looks it is going to be a while before that materializes.

I'm sure they are avoiding it because it is a performance nightmare.

Web pages on the topic:
https://answers.unrealengine.com/questions/49911/recreating-udks-utportals.html

https://forums.unrealengine.com/showthread.php?7662-Recreating-UTPortal-from-UDK-in-UE4-%28the-portal-effect-from-Portal-in-UE4%29&p=64070#post64070

Demo of a hacked portal:
https://www.youtube.com/watch?v=hzzAVsHZ1jo

Here is the UE4 roadmap (no portals there):
https://trello.com/b/gHooNW9I/ue4-roadmap

Friday, June 6, 2014

Starting Over: Tuscony for UE4

I decided to make the plunge into UE4 and discovered that most of my previous work is lost (maps and kismet)

I need a project that will help me learn everything about UE4. I'm going to recreate and improve the Tuscony demo in UE4.


https://d39nlaid7cu5vo.cloudfront.net/shareuploads/apps/1374203063522b3r94wjyvi/screens/1374192331894673y4iy66r_1381343369674.jpg

I will include the run/jump ability from the Stacks, a setting screen to change movement mode from view/fixed and a new teleport mode. There will be a larger area to visit and possible more homes. We'll see how it goes

A few shots for inspiration:

http://privateitalytoursltd.files.wordpress.com/2012/11/tuscany-hills-view.jpg

http://blog.luxuryretreats.com/wp-content/uploads/2012/08/Tuscany-Hills.jpg

This is Vernazza:
http://www.thetuscanmagazine.com/articles/wp-content/uploads/2011/10/Tuscan-Coastline.jpg

Here is a poor man's pano from the tower:

Wednesday, June 4, 2014

Mathmos Astro Lamp for the US


I wanted a nice lava lamp for my desk (just like the one in the photo above). Little did I know the rabbit hole this would send me down.

The Exclusivity Restriction
The Lava Lamps in the US are made by a company called Lava Lite. They bought the exclusive rights to lava lamps in the US from the UK inventor Mathmos.

The quality between the 2 is very different. Many people have described the Lava Lite as a junky inferior product with a lower wattage light bulb. The Mathmos looks much more sleek. I watched their "making of" video and was impressed with the level of detail that goes into making a lamp.

So I thought, hey, I want one of the Mathmos Lava Lamps (called Astro Lamps). That's where stuff got weird. You can not buy a Mathmos from them due to the Lava Lite exclusivity. Furthermore I could find NO website that sold them with shipping to the US. Then I went to ebay. I couldn't find a good Mathmos there either.

I got a chuckle out of this forum thread:
http://oozinggoo.ning.com/forum/topics/mathmos-in-the-usa

"If one were to get a Mathmos lava lamp into the US via a secret submarine or coke mule (seriously the Mathmos rep made it sound like the feds would beat down my door if I even thought of shipping one over)"

Obsession
At this point this tipped over from a curiosity to a "I'm getting one of these bastards".

I remember back a few years ago when I wanted a Japanese papercraft model only available in Japan. After a lot of research I found a mail proxy that I shipped it to and they shipped it to me.

UK Mailer Proxy
I found a UK mailer proxy for getting the Mathmos: ukaddress.com


Signup is 5 pounds and handling fee for the package is an additional 5 pounds.

With ukaddress.com you get a legitimate UK address. They assign you a suite number that maps to your account. When they get the package they then send it to you via international shipping.

My UK address is very strange. I sent them a verification email to make sure I understood exactly what the address1, address2 and city were. They responded in a few hours

I then called my credit card company and told them that I was buying a product from the UK. They stayed on the phone with me as I placed the order to ensure everything went well.

Order Placed
I feel like I just threw a ton of money into the wind. I hope this goes well. {crosses fingers}


After you place an order you add to your incoming orders at ukaddress. If this works as planned I have to give ukaddress credit for a very easy and transparent process.

Power
The last piece of the puzzle was power. I could have modded the lamp but I went the easier route and bought a 110V -> 220V up convertor and UK powerstrip:


Shipping From Mathmos to ukaddress
I got a shipping confirmation this morning. woot! It is on its way to ukaddress.

Potential Snag
It appears there is a liquid restriction on international shipping from the UK. You can not ship any liquid over a litre. That is .26 gallons. Rumor has it that ukaddress will not ship any liquids. We shall see. I'm not digging the thought of returning a product remotely. I adjusted the description of my item to say it is a lamp from a lighting vendor. Nice and generic. It will say Mathmos on the outside of the box but they do produce non-liquid items...

All this trouble over a damn lava lamp. Seriously! Where is that secret submarine when you need it?

UKAddress has received the package
This email was waiting for me this morning:
subject:Your UKAddress Order 4732 has been approved

I was then asked to go to their site to ship the package.

The cost of shipping
Wow shipping and handling is expensive. This is the cheapest option:
UPS - UPS Express Saver (3-4 Days) - £35.50 + Processing Costs: £ 5.00 = $68

Well I'm all in at this point. Let's do this! 
After I made the payment it kicked me back to their main page with no indication that the payment was successful. After a couple of minutes I received a "shipment confirmed" email.

Looked like I'm good to go. It cost almost double the price to get it but I think it is on its way. Now it just needs to make it through customs. 

It has shipped!
I just got an email with a tracking number. The package is in route. 

Arriving today
The package will arrive today. Ironically, faster than the converter so I can't use it until that arrives :(


It is good to go
It arrived safe and sound and ironically with the other 2 packages.


So there you go. I can't believe it went this smoothly. It looks great on the desk. It's been warming up for 1/2 hour so far. I can't want to see this in action.