Monday, September 23, 2013

Forester Pro


September 23, 2013

I've spent a lot of time over the last few days building trees in blender using Sapling, texture mapping them and exporting them into UDK. Although the results looked nice, it required a lot of work.

I started digging around and found "Forester Pro". This gem of a program costs $20. You get a bunch of standard trees to start with and can buy additional packs for $10 each. That is dirt cheap considering the cost of 3D studio max stuff.

At first I was skeptical. I figured I wouldn't have the control I needed to get the vertexes down to a reasonable amount. I was wrong.

Within 30 minutes I had created a tree with about 500 faces that imported smoothly into UDK:


In another 15 minutes I had a forest of birch and maple trees I was able to walk around in:


It also automatically generated 2 LOD models and can build in animation. I don't know exactly how to enable the animation or LODs yet but I think with a bit of effort I'll have that nailed down tomorrow.

Saturday, September 21, 2013

Photoshop -> Blender -> UDK Workflow


September 21st, 2013

Over the last few months I've learned a ton about blender and UDK and thought I'd pull it all together in a concise 3 part tutorial series. This series will show you how to take an image you find on the web and work it all the way to the point of an object in UDK. I don't skip any steps in the production of the texture, blender object and UDK material/objects.


This video covers:
1. finding the texture on the web
2. creating the texture in photoshop
3. creating an alpha channel for see-thru windows


This video covers:
1. creating the object in blender
2. mapping the texture onto the object
3. creating a clipping region for the object


This video covers:
1. loading the texture into UDK as a material that uses the alpha channel
2. loading the object into UDK using the material
3. fine tuning the size of the object
4. adding the object into a UDK game and walking around it

Wednesday, September 11, 2013

Creating a seamless texture


September 11th, 2013

If you do any 3D work you will eventually find yourself needing to add your own textures. For these textures to work well in your 3D environment they will need to be seamless. Fortunately this is not difficult to do.

My tutorial does require you to have photoshop. I will try to keep it simple and not skip any steps.

Step 1 : take your photo. This is an image take from the Hennepin Avenue Bridge in Minneapolis. It is surprisingly difficult to find spots to get overhead shots of streets and grass.


I am going to focus on creating a semi-dead grass texture from this image. Here is my selection:


If I expand my image to have 4 copies of it you can see the seam issue. We need to eliminate these seams.


Fortunately Photoshop has the perfect filter for the job. It is called the offset filter. What it does is takes the corner of the image and moves it towards the center.


Our objective is to move the corner exactly into the center. To do this you need to look at the current size of your image and divide it by 2. My image was 1562x1562 pixels. I need to move the corner 781 pixels down and the right.


This shows you what happened:

The center of your image is now the edge and the edges are now running horizontally and vertically into the center. Now you just need to fix the center area to not have a seam and you are good.

We are going to use the clone tool:


Update (July 22nd, 2014): ------------------------------------------
I've built a lot of seamless textures since I did this posting and one thing is very important: Use a hard clone, not a soft/blurred clone. 

Sometimes if the image has a lot of lighting transitions I will cut it down to half size and copy it vertically (transform: flip vertical) and copy it horizontally (transform: flip horizontal). Then you just need to remove the mirrored look to the image which can be a lot easier than fixing the lighting differences.
---------------------------------------------------------------------------

To use the clone tool you press the alt key on top of where you want to clone from (the red circles in this image) and the left click. This will set the clone position. Then click on the area you want to clone onto and you can start cloning. You will need to experiment based on what your seam looks like


Once you are done clone out any obvious noise. In the above image I cloned out those white specs.


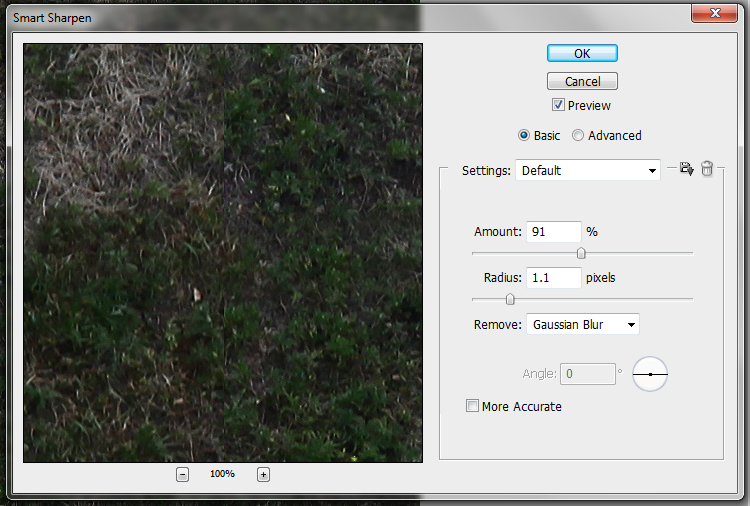
I always sharpen my images. The best filter to use is the smart sharpen tool.


The amount and radius will vary based on the size and make up of your image.


To get your texture to work within UDK you need to have the image be square and be a multiple of 2. I picked the closest smaller value from my image size (1024 x 1024). I may not use this size in the final game but I have kept the largest quality image I could.


Here is the final image for you:


Monday, September 9, 2013

Landscaping for UDK


September 9th, 2013

The first part of my level design earlier in the summer went very well. I can pretty much build anything I want in blender, map textures onto it and import it into UDK. It gave me a false sense of progress. Then I started doing landscaping. Yea... that isn't going so well.

I have spent a LOT of time creating a landscape for my level. I have several unique difficulties to overcome:
1. My landscape is next to a highway surrounded by buildings, roads a river, etc... This isn't some woodsy scene that I can cook up a complex texture to resolve. It is urban
2. My scene can be viewed from a height of 22 stories. This means it needs to look realistic from a great height in all directions.
3. The part of my scene the player can walk around in needs to be at least a quarter mile in all directions.

Combine all that together and you have a noob landscaping nightmare.

I am going to detail all the different things I've learned about landscaping. I will likely need to use some of this information in the future and most of it is uber counter-intuitive so I will detail the steps for each approach.

Here are my current approaches:

1. Flat satellite imagery:
Grab the satellite imagery in a several mile radius from my scene, cut them into 2048x2048 squares and map them onto large squares.

plus:
> it looks awesome from 22 stories up, like you are on a plane.

minus:
> it looks horrible close up
> there is no height to the landscape

2. Hand built landscaping height
Take the satellite square where my scene lives and build a landscape that fits it. Not squares but cut terrain to match the image.

plus:
> it looks a lot better

minus:
> clipping is a bitch.
> since the image is not a grid of squares, it inevitably looks crappy in UDK. I tried this several times. Unhappy results every time.

3. Use a height map with blender
I created a height map in photoshop (which I will detail later), shrunk it to 100x100 and used it as a displacement modifier in blender. Then I unwrapped it onto a texture of the satellite square It was based on.

plus:
> This looked pretty darn good.

minus:
> blender can't handle large grids well. Anything over 100x100 made it get very unhappy (slow).
> unwrapping the texture did not go well. Instead of a square grid mapped perfectly onto the texture it becomes a warped area. It is somewhat close but there is no fixing it when you have 10,000 squares.
> when the grid is imported into UDK, certain faces are not rendered. I've seen this before and I can usually correct it but adding additional faces. That isn't possible with a modifier since it is adding the height in code.
> no clipping. Again, that would suck adding manual clipping for landscaping

4. Use UDK's landscape tool
Use a specific size heightmap to import into the UDK landscape tool. Then you add your materials and paint onto the landscape.

plus:
> it has perfect clipping
> Very fast game performance
> High level of detail

minus:
> Does not blend well into surrounding satellite imagery.
> uber large flat landscapes require perfect textures. Mine are seamless but you can still see patterns
> Landscaping provide great detail BUT stuff urban like sidewalks and roads don't really work.
> textures are broken into squares. A diagonal path is going to look blockish

End Analysis:
I think the only viable route is the UDK landscape. I will need to ditch the satellite imagery and dynamically generate homes/streets/trees in the distance.

Saturday, July 20, 2013

Masked textures in UDK


July 20th, 2013

I have been working on my project and discovered that 20,000+ actors/meshes on the map can easily drag performance into the toilet. I am rethinking my models to minimize faces/vertexes. A big piece of the puzzle is masked / see-thru textures.

I had a hell of a lot of trouble getting masking to work properly. I thought I'd document the key bits of the process for reference & anyone else trying to solve this problem. I have photoshop as an image editor. I do a ton of photography and have been using this tool for a long time...

1. I built a sample graffiti cube texture with 2 windows. I cut the window areas out on the texture:

1. [CNTL]-click on the image of the layer. This selects all the pixels on that layer excluding the window cut outs in this case:

3. Click on the Channel tab and click on the alpha-channel button at the bottom. This adds the alpha channel for the windows.


Save your image as a 32 bit Targa (tga). If you save it as 24 bit, the transparency won't work: 

In UDK I imported the texture. I created a material directly from the texture. Here are the settings for the import:

After the import, the material doesn't work for some reason. Open the material, drag the texture around and then click the green checkbox and voila, you have a masked texture.

Monday, July 8, 2013

Blender & UDK continued

July 8th, 2013

Scale
Making sure your blender objects are the right scale is important if you intend to export them to UDK (or any engine). I've seen the following 2 setups:

Metric : 1 meter per grid square:
lines 16
scale 50 (a cube of 50 theoretically exports to 1 meter in UDK)
subdivision 10 (metric is all about divisions of 10)

Imperial : 1 foot per grid square:
lines 16
scale 16 (a cube of 16 theoretically exports to 1 foot in UDK)
subdivision 12 (12 inches per foot)

My observations:
1. a cube of 16 does not appear to be big enough for a foot. I think 22 is closer.
2. Blender builds its grid and snap-to-grid in multiples of 2. If you want your object to snap nicely inside UDK, it will need to be a multiple of 2. 16 works well & 50 does not.
3. these settings are done in the properties panel for the 3d view. while in the 3d view, press n and go to the "display" section.

I am going to go with a scale of 16 for now. I will see how that plays out over time.

Sunday, July 7, 2013

Blender -> UDK


July 7th, 2013

Creating Blender Meshes & Importing them into UDK

It has been a while since I posted but that doesn't mean I've been idle. There is so much to learn about blender and UDK that it is often intimidating to know where to begin. I have been focused on Blender, learning how to create meshes, simplify them and add texture to them.

I have learned a lot and I thought I'd jot down the important stuff that is a combination of information from a variety of sources.

Blender notes:

Texture Solid
If you are going to apply a texture to your mesh/object you need to view your object as textured solid from the start. I wasted an entire day building a complex object to find out that it was a mess when it came to applying the texture. What do I mean by this? Well, each face has 2 sides to it. One side is not textured and one side is textured. The is referred to as the face's Normal. When you add faces by hand (click 3+ vertexes and press f) blender doesn't know which side is textured. If you are not viewing the object as textured, you will end up with a lot of faces with the texture side facing the wrong way. If your object is complex, like a house/trailer, you can forget trying to fix it if you didn't start off viewing textures from the get-go
To view your object as textured, in your 3D View press CNTL-N to view the properties panel and select 'singletexture' for shading and check 'Textured Solid'.

Starting from a cube
For a project I am working on I needed to model a trailer. I watched some clever tutorials on building homes from floor layouts. They started with a plane that they extruded along the walls to build the house. Once complete they extruded the planes along the z axis. This was great except for one big problem: The faces on the extrude randomly faced inward and outward.
I recommend you don't start with a plane but with a cube. Blender then knows which way textures face because the cube starts out correct.

Vertex/Edge/Face cleanup
If you extrude cubes a lot, you are going to get a lot of vertexes, edges and planes. Reducing these as much as possible is important to improve render time. My goal with my trailer object was to eliminate all non essential vertexes/edges/faces to maximize performance. I have merged so many vertexes and created so many faces that it is second hand. I took it to an extreme however and when it came time to apply the texture to the faces, the face geometry was too big and complex and it made a mess out of things. In the end, I settled for smaller rectangles/squares when at all possible.
Example: even though the floor could be 1 rectangle, I chose to break it into about 20 rectangles so the texture could be unfolded for each rectangle.
So.. the rule of thumb is to not make faces of your model too large or your texture will look overly stretch. Break large faces into smaller faces to improve detail.

UV Map Texture
My goal with my object was to create one 1024x1024 image that contained all the textures I would need for my model. This required some planning. My image ended up containing 6 different images that I appropriately placed unwrapped faces onto:

I downloaded the images I needed from http://www.cgtextures.com. I then put them together into one image via photoshop. I knew the primary detail would be the white siding. The second largest detail would be the red siding. The remainder did not need as much detail. I may revisit this layout so that I can add curtains and other window details.
When you unwrap faces with a non-organic object like this, do it one face at a time. Blender does a much better job creating a face on the UV map you can work with.
For the trailer, I determined the largest face for each texture and based the size of the remaining faces mapped on the UV image from that. As you can see from the above image, you have complete control over the orientation, position and scale of the faces on the UV map.
Note: I heard that images for UDK must be a factor of 2 (ie: 128x128,256x256,1024x1024,etc). I am unsure if this is true but I wasn't taking any chances.
Here is an excellent tutorial on UV map editing:

Collision map for UDK
If you intend that your blender object lives in UDK, you will need a collision map. It shouldn't be anything fancy. For my trailer I create 1 cube that surrounded it. Here are the rules for collision objects:
1. You can have as many as you want
2. give each collisioin object the name UCX_* (* can be anything).
3. The collision objects do not need to touch each other
4. A collision object can not have any convex points
5. Keep it simple when at all possible

Exporting for UDK
When you have your object complete, export it to FBX format. This will not include your UV map texture but it will include your mapping of faces onto the UV map texture.

Importing into UDK
I don't know what it is about tutorial videos but no one seems to cover all the parts of importing into UDK in a clear step-by-step manner. I had to watch 4 different videos to understand everything I needed.
Here is what you need to do:
1. You need a Targa version of your UV map texture. You just need to save your image in photoshop as a targa. In the end I had a PSD (photoshop), JPG and TGA of my image.
2. Import the TGA as a texture in the content browser
3. right click in the content browser and add a new material
4. drag your TGA file into the material editor
5. connect black square on the texture to the 'diffuse' black square in the material and save the material:

6. import your FBX file
7. open the object and expand the LODInfo section until you get to Material entry
8. select your material from the content browser
9. click the green arrow on the Material section of the LODInfo on the object

And voila, you are done.

I must say, I am very impressed with the results in UDK. It looks really good and scales nicely. I am very excited about the project I am working on. In a few months I will post a link to it for the Oculus. It will be great. Really great.